Table of Contents
Importing the student records into a new school management system sounds straightforward. Export a spreadsheet, upload it and start using the software.
In practice, the spreadsheet is rarely that simple. Student names may be stored in different formats, guardian details may be incomplete, and class assignments may not match the new system’s structure.
The solution is to prepare your records for the system you are moving to, test a small batch and verify the results before importing everyone.
This guide explains how to prepare a student CSV, check academic placement, use import verification properly, and confirm that the records are usable after import. It also covers staff records, which many schools need to organise during the same setup process.
1. Start With the CSV Template, Not Your Existing Spreadsheet
Before changing your current student list, open the destination system’s import section and download its sample CSV file.
This is important because different systems use different field names and formats. Your spreadsheet might contain a column called Parent Name, while the importer expects a specific guardian field. Simply uploading the original file may result in missing or incorrectly mapped information.
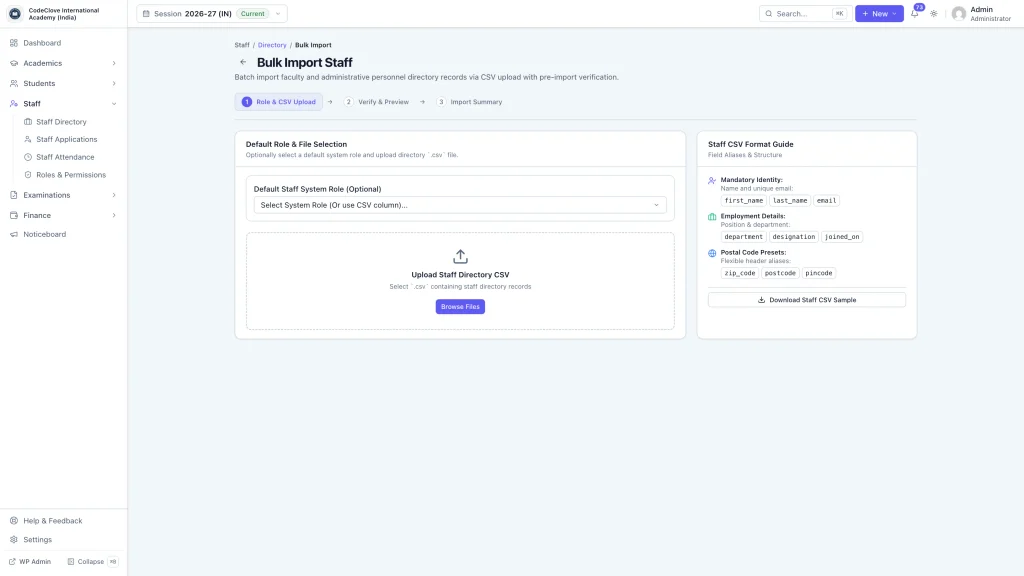
In CodeClove School Management Pro, the student bulk import screen includes a CSV format guide and a downloadable sample. Its student identity fields include first_name, last_name, and student_name. The guide also specifies guardian-name options and recognises postal-code header variants such as zip_code, postcode, and pincode.
Use the sample provided by your installed version as the authoritative template. Do not assume that every listed field is interchangeable or that a familiar column name will automatically map correctly.
If your existing spreadsheet has different headers, create a mapping before editing it.
| Your existing column | What to check |
|---|---|
| Student Name | Does the destination expect one full name or separate name fields? |
| Admission No. | Is there a corresponding admission-number field in the template? |
| Parent Name | Which supported guardian field should contain this value? |
| Parent Phone | Does the importer accept this column, and in what format? |
| PIN Code | Does the destination recognise your current header? |
The objective is to preserve the meaning of every value, not simply to make the column headings look similar.
2. Check Student Identity and Guardian Details
The most important records to get right are the ones staff use to identify a student and contact their family.
Start by checking student names and admission numbers. Two students can share the same name, so names alone are not a reliable way to distinguish records. Preserve existing admission numbers wherever the destination supports them, and investigate duplicate or missing identifiers before importing.
Next, review parent and guardian details.
CodeClove’s student import guide identifies father_name, mother_name, and guardian_name as supported guardian-name fields, with at least one guardian-name value required in the interface you supplied.
Consider two sample records:
| Student | Guardian information | Action |
|---|---|---|
| Aarav Sharma | Father name and phone available | Check the corresponding fields against the CSV template |
| Sara Khan | Guardian name available, father name blank | Use the supported guardian field and confirm the record passes verification |
Do not fill missing information with invented values just to make a spreadsheet appear complete. Correct what you can from the school’s source records and flag anything that needs verification.
Also, check siblings individually. Two students may share a guardian and phone number, but they must remain separate student records linked to the appropriate family information.
3. Prepare the CSV Without Damaging Its Values
A spreadsheet can look correct on screen and still change values when exported.
Before saving your file as CSV, check these common problems:
- Phone numbers and postal codes: Spreadsheet software may remove leading zeros or interpret long numbers incorrectly. Format these columns as text where necessary, then inspect the exported values.
- Dates: Use the date format expected by the destination system. Check a few dates manually after exporting instead of assuming the software will interpret them correctly.
- Extra spaces and blank rows: Remove accidental spaces around identifiers, empty records at the end of the sheet, and duplicate rows.
- Column headings: Keep the headers from the sample template. Avoid renaming them after the file has been prepared.
- File structure: Use one header row, with each student’s information on a separate row. Avoid merged cells, decorative headings, or multiple tables in the same worksheet.
For example, if an admission number begins with zero, verify that the zero remains in the final CSV. Losing that digit can make the imported value different from the school’s original record.
Keep an untouched copy of the original export and make corrections in a separate working file. This gives you a reliable reference if a record needs to be investigated later.
4. Select the Correct Academic Session and Class
Student data is not just a directory of names. Each student also belongs to an academic structure.
CodeClove’s student bulk import interface asks you to select an academic session and class before uploading the CSV. Section selection is optional.
Make these choices deliberately. A file intended for the 2027 to 2028 academic session should not be imported into the previous session simply because it was selected by default.
Pay particular attention if your spreadsheet contains students from several classes. Do not assume that selecting a class automatically sorts a mixed-class file into the correct destinations.
First, test a small batch and examine how the preview handles placement. If your import configuration applies the selected class to the entire batch, prepare separate files for each relevant class and repeat the process for the correct target.
This may involve more than one upload, but it is easier to verify several clearly defined batches than to correct a large number of incorrectly placed students afterwards.
5. Use the Verification and Preview Stage Properly
Uploading a CSV is not the same as confirming that its records are correct.
CodeClove’s student import wizard follows three stages: placement and CSV file selection, verification and preview, and an import summary.
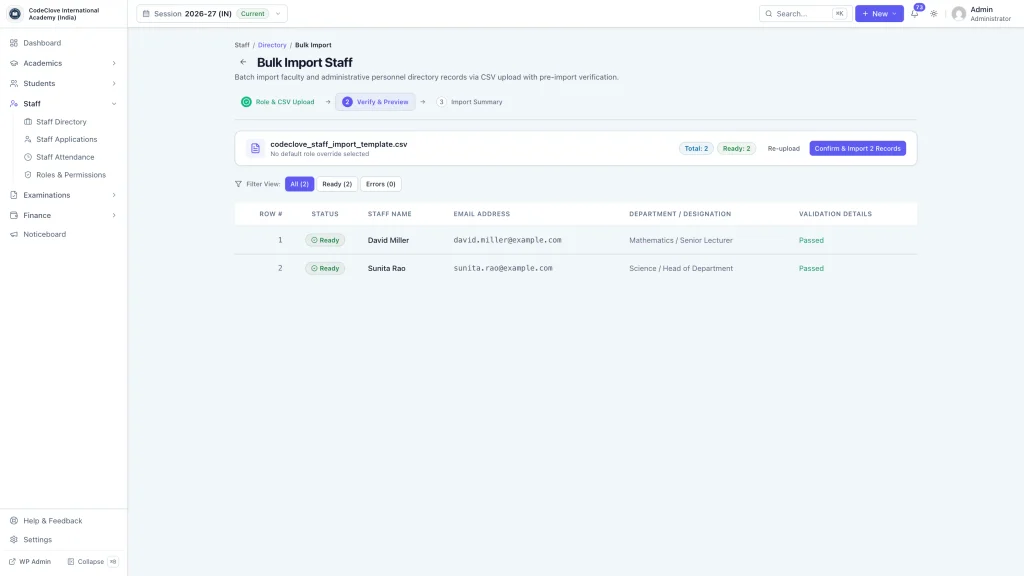
Use the verification stage to catch issues before proceeding. Review the student names, required fields, guardian details, and selected academic placement. Look for missing values, malformed records, or anything that does not match the source spreadsheet.
For your first import, choose a small test group of around 10 to 20 students. Include ordinary records as well as a few cases that may be more difficult, such as siblings, students with incomplete guardian information, and names containing spaces or hyphens.
After importing this test group, open several student profiles in the system. Check that the records were saved correctly rather than relying only on the preview.
If some rows fail, correct the underlying data and check how the importer handles records that were already imported before uploading again. Repeating the same file without understanding that behaviour could create duplicate records.
6. Check the Import Summary Against the Original File
Once the test import finishes, compare the results with the file you uploaded.
Suppose your CSV contains 20 student records. If only 18 are reported as successfully imported, find out what happened to the remaining two before continuing.
Do not stop at the overall record count. Open selected profiles and confirm that the actual values are correct.
Check at least these items:
- Student name and admission number.
- Guardian name and contact information.
- Academic session and class placement.
- Section or roll number, if applicable.
- Any other required fields included in your template.
For a larger school, keep a simple record of how many rows were prepared, imported successfully, and rejected or left unresolved. This provides a clear checkpoint before you move to the next batch.
Once the test batch is correct, repeat the process for the remaining students, using the appropriate academic placement for each group.
7. What About Staff Records?
Staff records can be organised during the same setup project, but they should use a separate CSV and import workflow.
CodeClove’s staff bulk import screen identifies first_name, last_name, and email as mandatory identity fields. Its guide also includes employment details such as department, designation, and joined_on.
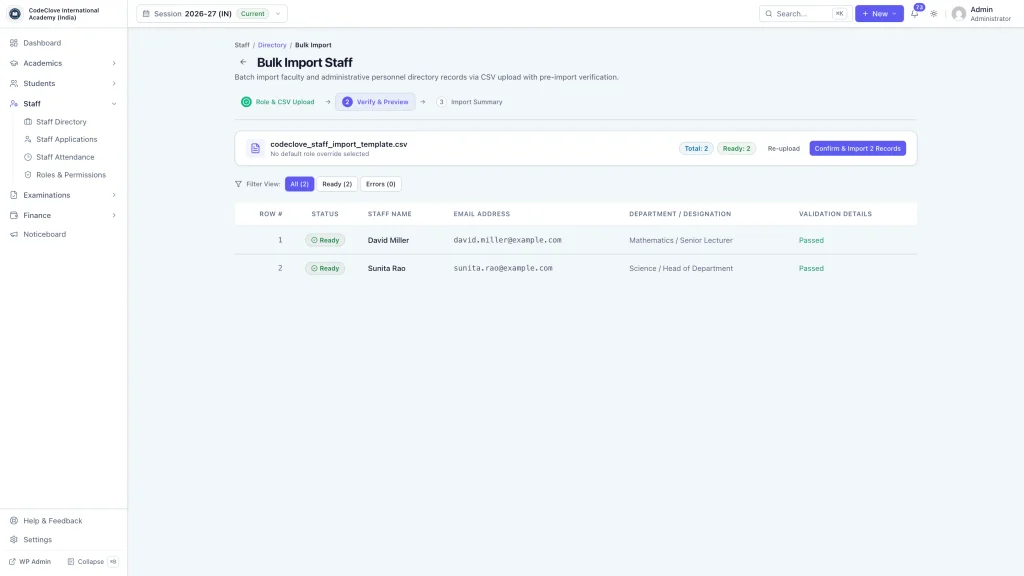
Pay particular attention to email addresses. Check for duplicates, spelling errors, and outdated addresses before uploading the file.
The staff importer also allows an optional default system role. Before using it, decide whether the intended staff members should have the same permissions. A teacher, accountant, and administrator may need different levels of access.
Importing staff directory details should not be confused with verifying their login accounts and permissions. Check those separately before employees begin using the system.
8. Remember That a Directory Import May Not Transfer Everything
A successful student directory import does not necessarily mean that the school’s entire history has been migrated.
Fee transactions, attendance history, examination results, photographs, and uploaded documents may require separate supported processes. Do not assume that adding a student’s name and admission number to a CSV recreates these records.
Before retiring your previous system, identify which historical records must remain accessible and verify the available transfer options for each type.
Student information is sensitive, so restrict access to the source spreadsheets, store backups securely, and delete temporary copies according to your school’s retention requirements.
Summary: Make Student Data Import a Controlled Process
The safest way to import student data is to start with the correct template, map the fields carefully, choose the right academic placement, test a small batch, and verify the saved profiles before continuing.
If you are evaluating a WordPress-based school management system, CodeClove School Management Pro provides a dedicated student CSV import workflow with placement selection, pre-import verification, and an import summary. You can review the Student Directory documentation to understand the available workflow before preparing your file.
A careful first import gives the school a much stronger starting point for managing student records throughout the academic year.